For many, organizing emails means using folders—a familiar sorting system offered by most email providers.
And then, Gmail changed the game by introducing labels instead of traditional folders.
This Gmail-specific feature can trigger some confusion among users migrating from email providers like Outlook, Apple Mail, and others that offer a folder-sorting system. Even today, many new Gmail users ask: “Are labels Gmail’s version of folders?”
This guide breaks down the difference between Gmail labels vs. folders, showing how the labeling system compares to the traditional folder system. You’ll learn how to use labels effectively and find steps for setting up a method that works for you.
Does Gmail have folders or just labels?
If you’re looking for a traditional “folders” feature in Gmail, you won’t find one. Gmail doesn’t offer folders in the conventional sense. It operates on a flexible labeling system that functions similarly to folders by helping you organize your messages.
However, the fundamental difference between the two features is that with labels, emails are not physically moved into separate containers. Your emails will remain in the “All Mail” section but will be tagged with the label of your choice for easier sorting.
Are labels in Gmail the same as folders?
No, labels are not the same as traditional folders. While both help with email organization, they function differently.
Labels are tags you can attach to an email to categorize it easily. They serve as an identifier, helping you sort the email without moving it from its original location. A single email can have multiple labels, allowing you to categorize it in different ways without duplicating it. For instance, you can label a work email as both Client requests and Priority.
On the other hand, the traditional folders (as seen in other email platforms) are like containers where you can store an email. To move an email to a different folder, you must remove it from its current location. For example, if you move an email from the Client requests folder to the Priority folder, it will no longer be in the previous folder. This is because an email can only reside in one folder at a time, making it less flexible than labels.
The table below helps summarize the differences between a label and a traditional folder:
Labels | Folders |
Function as tags that can be applied to emails | Function as designated locations where emails are moved |
Emails can have multiple labels without leaving the inbox | Emails must be removed from the inbox into a specific folder |
An email can have multiple labels | An email can reside in only one folder |
Emails remain searchable and visible across labels | Emails are stored in one folder and not visible elsewhere unless moved |
Folders vs. labels in Gmail: Can you use labels as folders?
Even though Gmail offers a labeling system, you may still prefer the more straightforward “out of sight, out of mind” organization that you get with traditional folders. If you want to declutter your inbox by moving some emails into defined categories, you can make Gmail labels function like a folder.
Gmail makes this simple with the Move to button. Here’s what the process looks like:
When you apply a label to a conversation, all the other labels in the email remain, including the inbox label. This means you’ll be able to see the email in your inbox and any other label that’s applied to it.
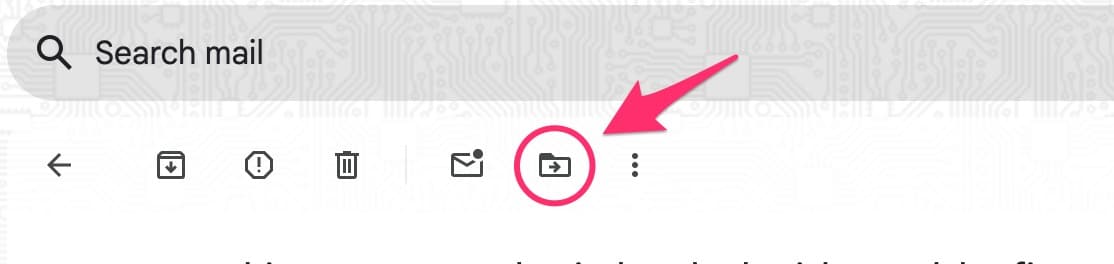
However, for many users, this method of organization can be confusing and still make the inbox look cluttered. The Move to tool helps you fix this.

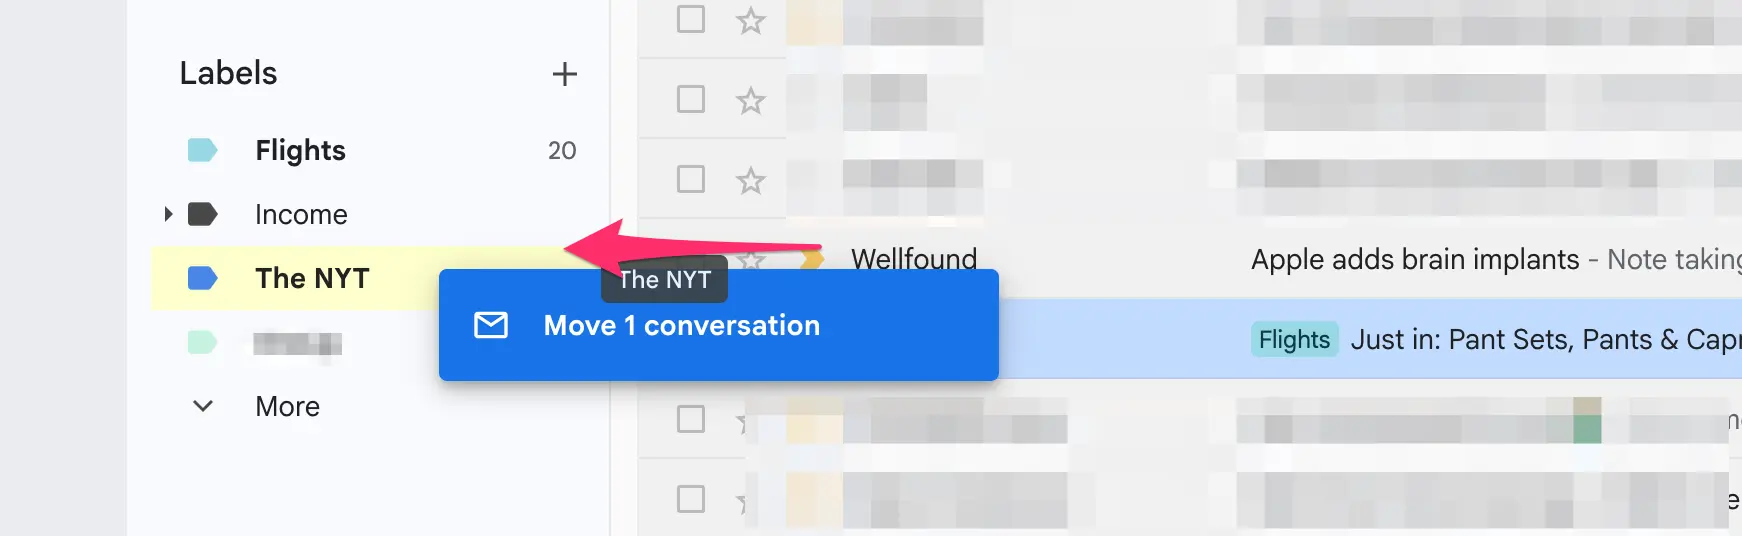
If you click the Move to icon in an email, you can assign only your target label to the message and remove all other labels, including the Inbox label. Alternatively, you can drag and drop a message into your desired label on the left sidebar on the Gmail home screen.
Moving from folders to Gmail labels: Setup steps
If you’re moving to Gmail from a different email service, you may be a little overwhelmed by Gmail’s label setup, but it’s not that hard to get used to. With just a few clicks, you can start managing your labels like a pro. The sections below will teach you how to:
Create a label
Add a label
Use the search bar to label emails
Send an email to a label in the Gmail app
Edit a label
Color-code a label
Set up automatic labels
1. Creating a label in Gmail
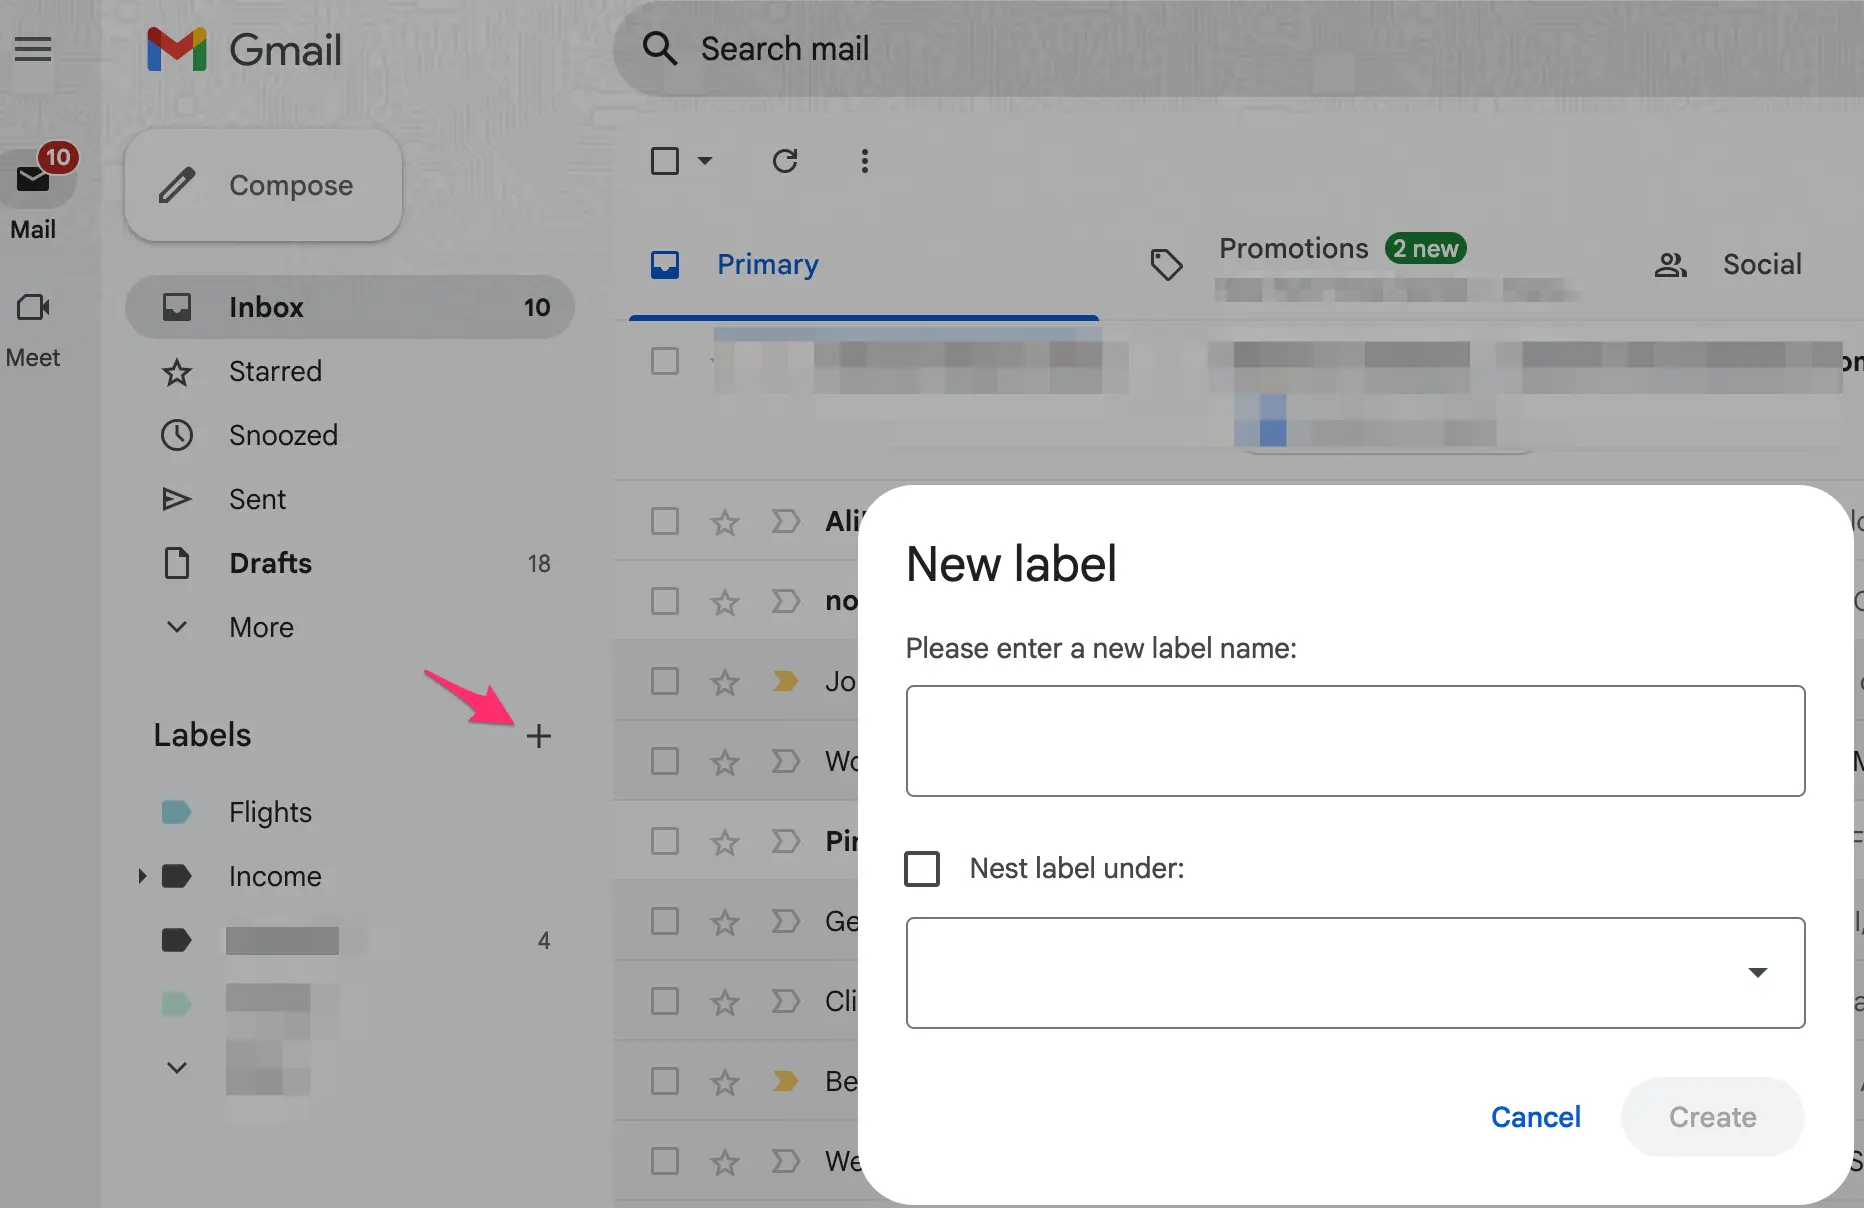
To create a label in Gmail, take the following steps:
Scroll down your Gmail home screen towards the left sidebar
Under the Labels section, click on the plus icon + to create a new label
Type in your label’s name
Click Create to complete the process
💡Tip: If you want to create a sub-label, click Nest label under and choose the parent label using the dropdown arrow before clicking Save.
You can also create a new label from within the email list by doing this:
Right-click the email you wish to add to a new label
Scroll down to Label as in the list that pops up
Click Create New and enter your new label name
Save your label by clicking Create
2. Adding a label in Gmail
There are many ways to add a label to an email. Here’s the simplest method:
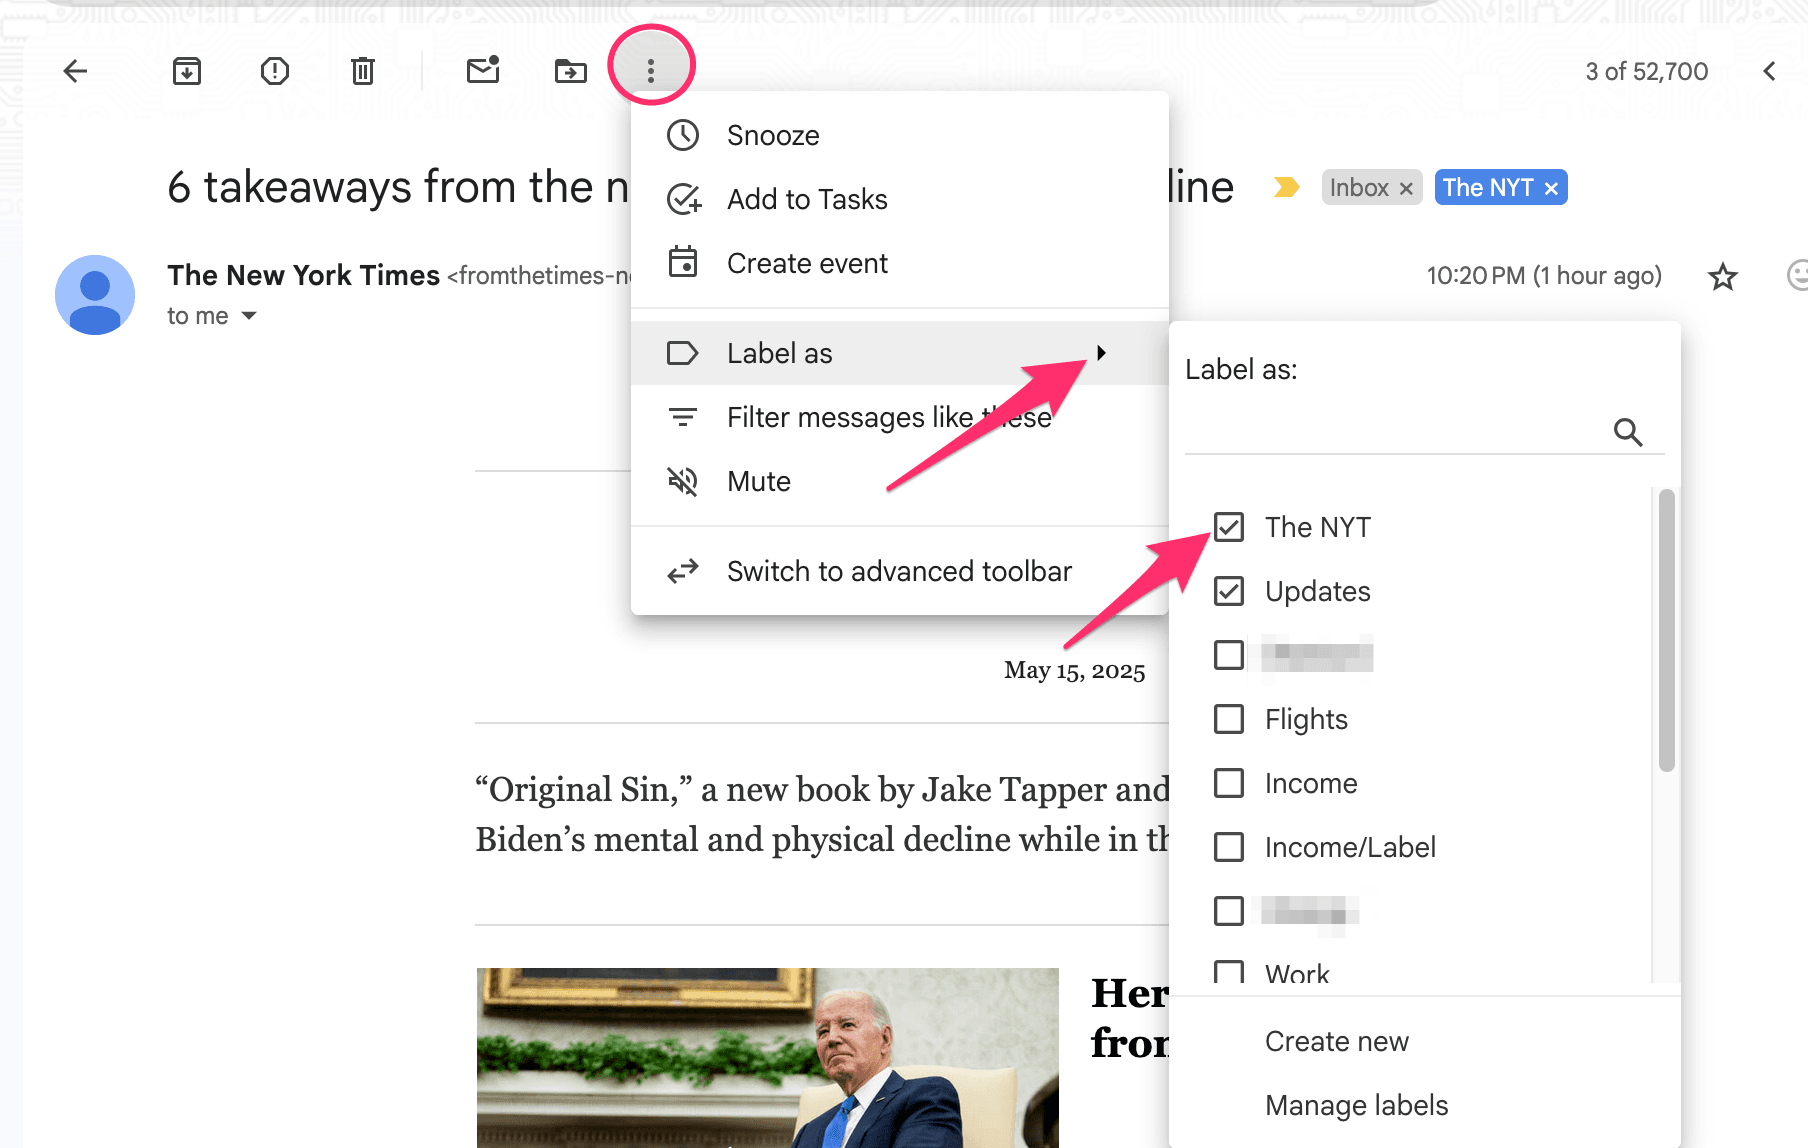
Open the email in Gmail
At the top, click the vertical ellipsis icon to reveal a list of options
Click Label as
Choose the label you want to attach to your email and click Apply to finish
You can also do this via the email list by right-clicking the email in the email list and following the same process as above.
If you want to add multiple emails to a label, follow these steps:
Tick the checkboxes beside the emails you want to move to a folder
Navigate to the top of the screen and click on the vertical ellipsis icon
Select Label as, and then choose your preferred label
Click Apply to complete the process
3. Using the search bar to label emails
You can use Gmail’s search bar to find the emails for labeling, which is especially useful for locating older emails. Take these steps to do this:
Click on the search bar at the top of the home screen
Enter your search criteria to help Gmail identify the emails you’re looking for. It can be the:
Email address or sender’s name
Keywords in the email
Email subject
Press Enter to find a list of emails that match your search criteria
Optional: Use the Advanced search option at the top to narrow the results
If you wish to add the label to all the emails in the results, click on the topmost check box on the list to select them
Next, click the vertical ellipsis icon and choose the label you need
Finish by clicking Apply
4. Sending an email to a label in the Gmail app
Gmail does not offer the option to create a label on its mobile app versions. However, you can add a label to an email on the phone once you’ve created it on a PC. The steps vary slightly between iPhone and Android apps. See the steps for your device below:
Android and tablet | iPhone and iPad |
Open the Gmail app Access the message you want to label Tap the vertical ellipsis icon in the top right Select Change labels Add a label or remove one by clicking the check box beside it Tap OK | Open the Gmail app on your iPhone or iPad Tap on the message to add a label Click the vertical ellipsis icon in the top right Select Change labels Check the boxes next to the labels you want to add Tap Apply |
5. Editing a label in Gmail
There are two main ways to edit a label in Gmail: through the home screen and through Gmail settings.

Through the home screen:
Open Gmail and scroll to the left sidebar
Hover on the label you want to edit and click the vertical ellipsis that appear
In the pop-up panel, select Edit and make modifications to the label
Click Save to apply the changes
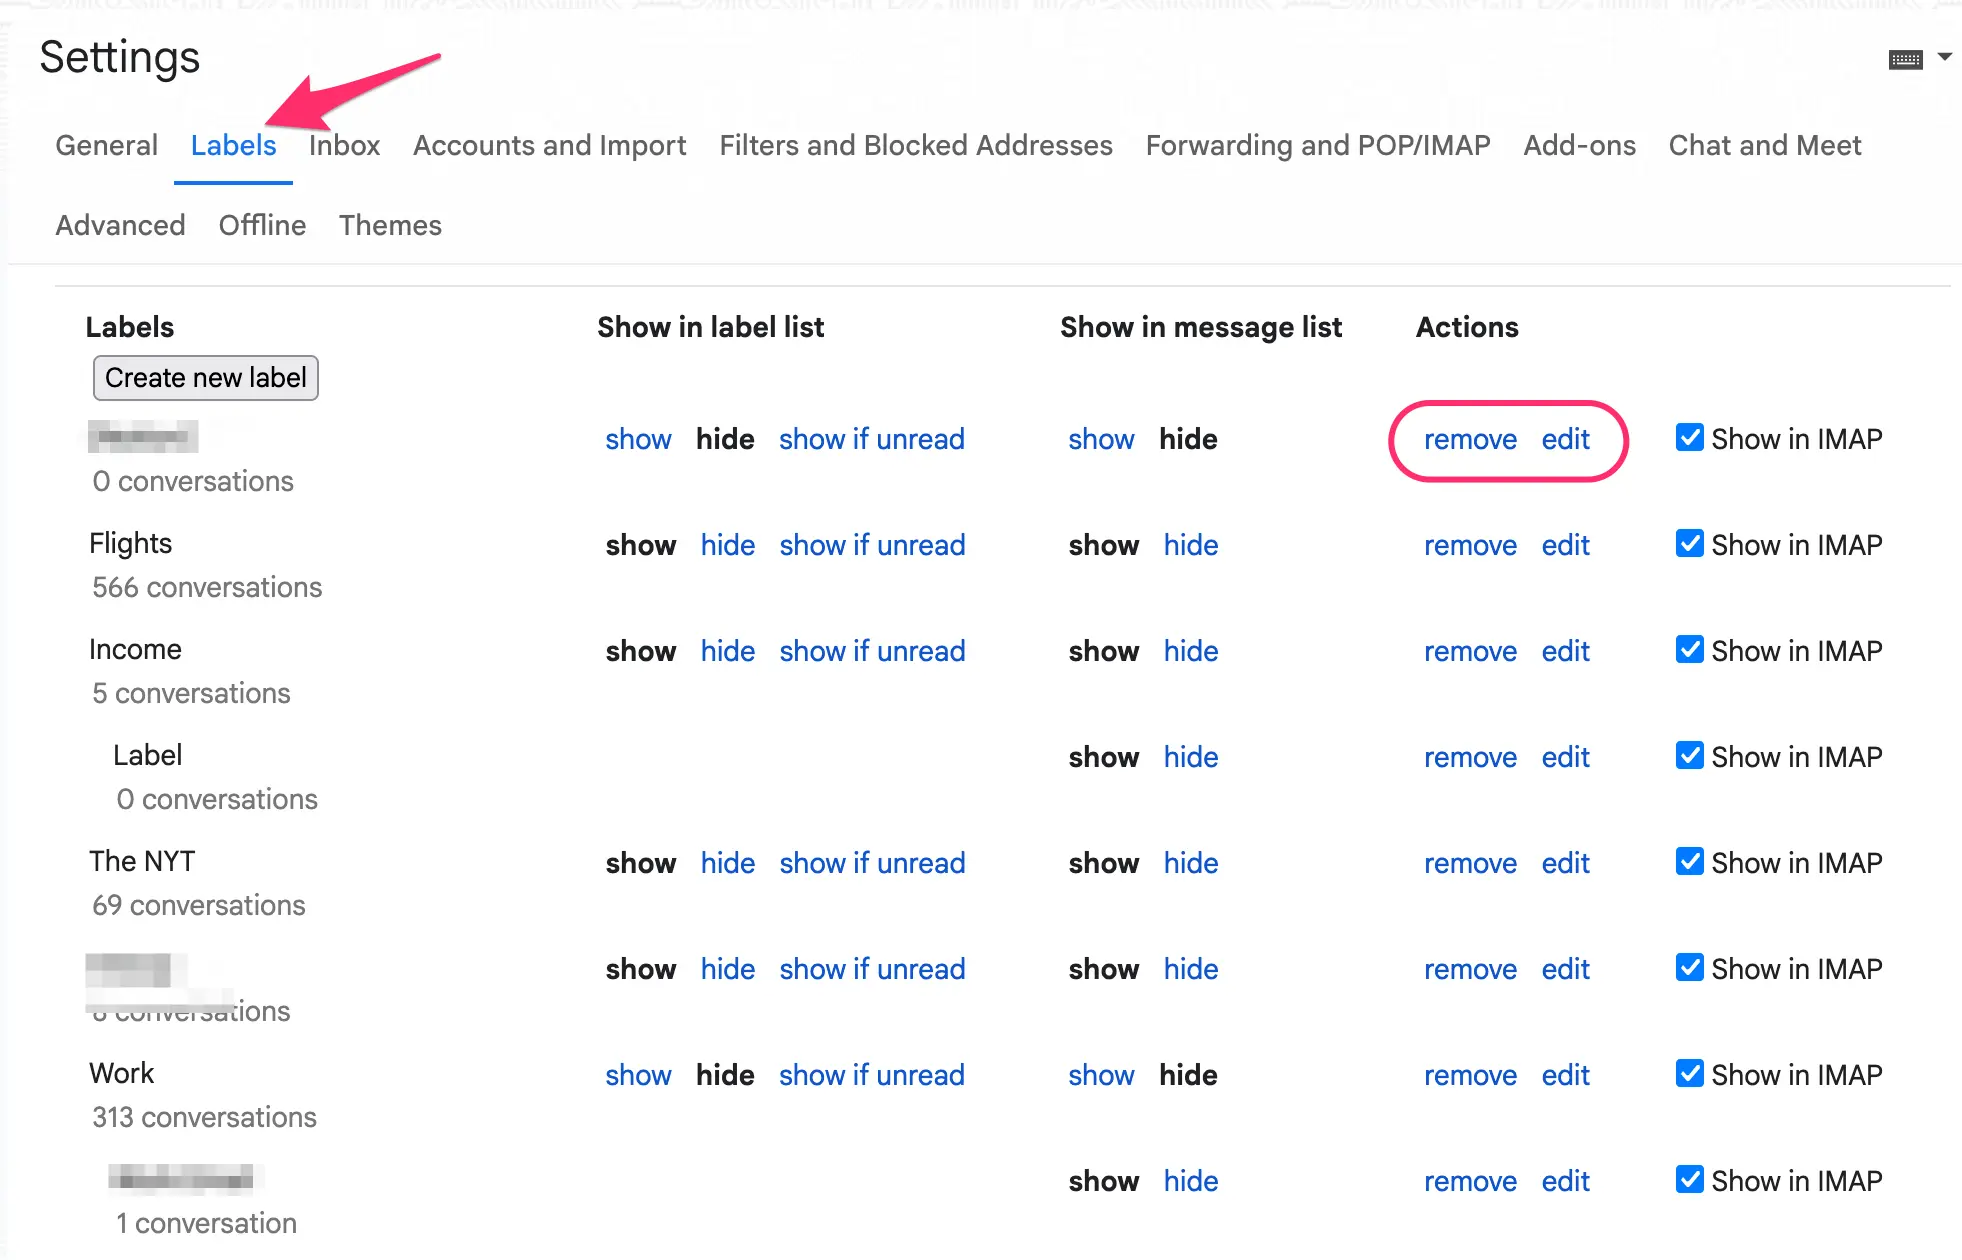
Through Gmail settings:
Click the gear (settings icon) at the top of your Gmail home screen
Click See all settings
Navigate to Labels at the top in the new window that opens
Scroll down to your list of labels and identify the one you wish to edit
To the right, click Edit to modify the label name or Remove to delete the label from your list
Note: Removing a label does not delete the messages tied to it, only the grouping. The messages are still accessible under All Mail.
6. Color-coding a label in Gmail
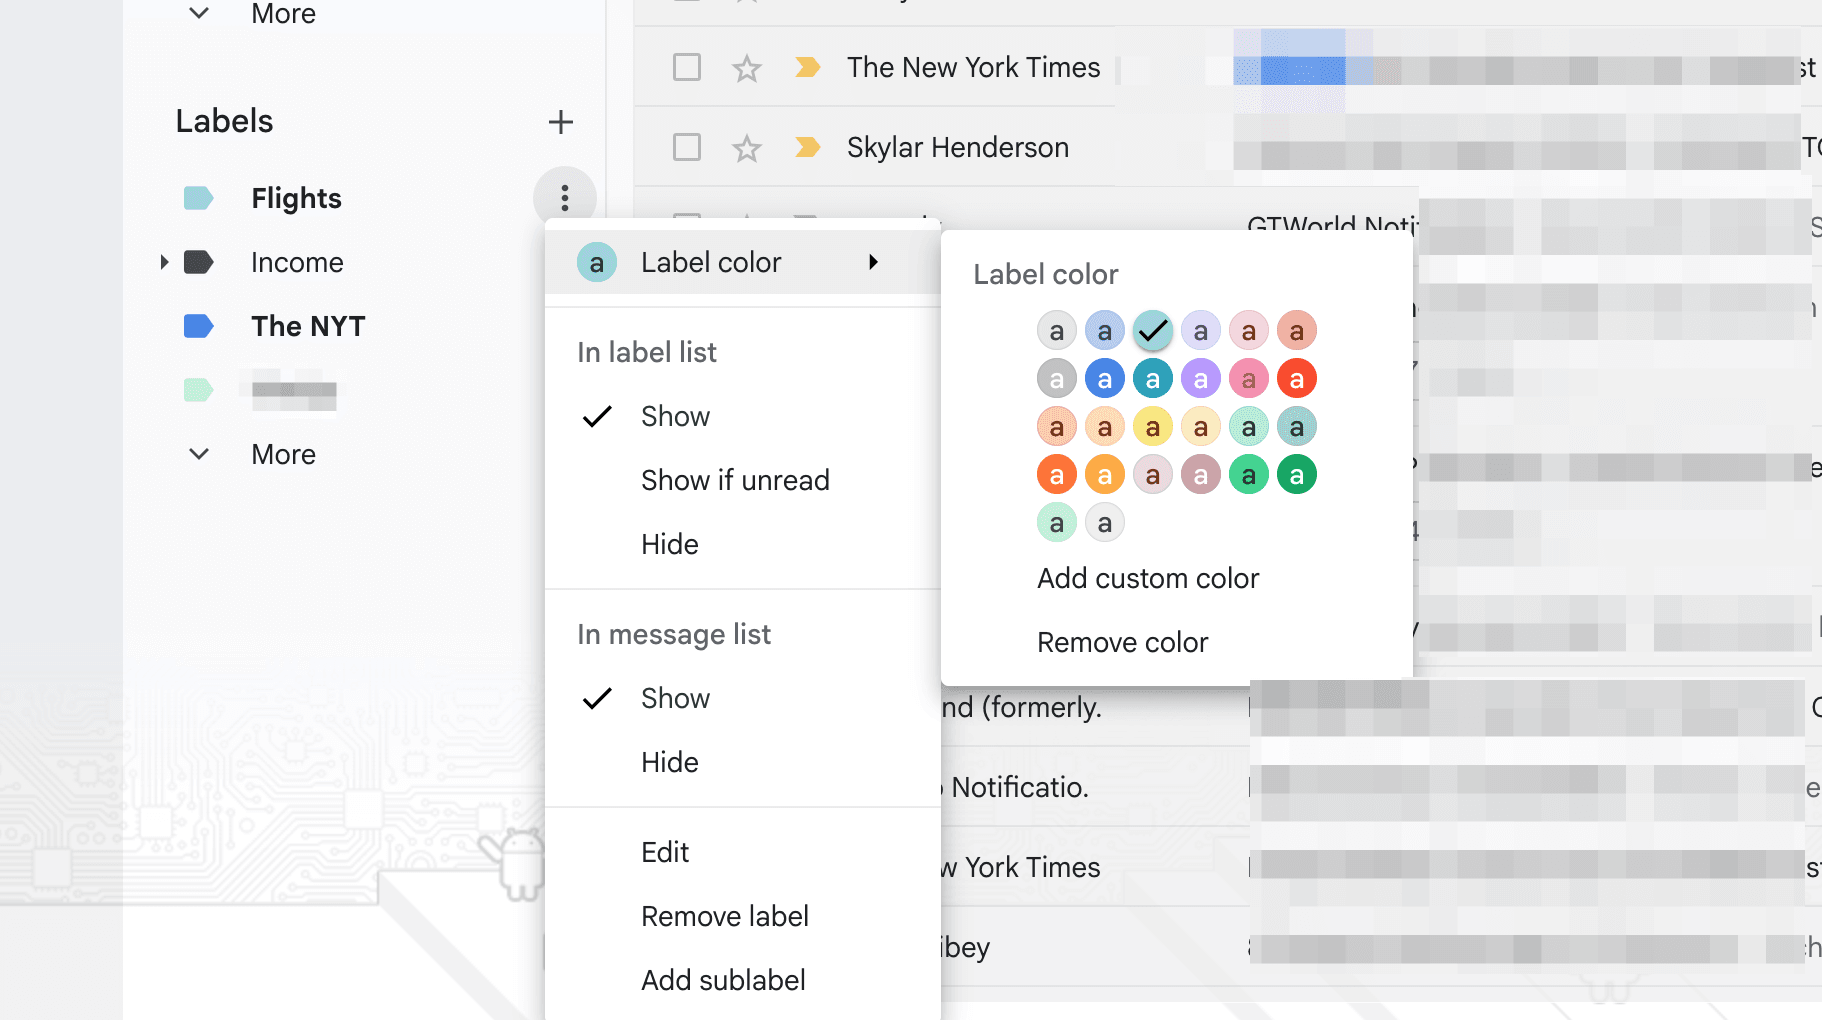
Unlike Outlook, which allows users to color-code emails, Gmail offers the option to color-code your labels so you can identify them at a glance and visually prioritize them. To add color to a label in Gmail, take these steps:
Open Gmail and move your cursor to the left sidebar
Under the Labels section, look for the label you want to color
Click the three dots that appear when you hover over the label
Click Label color on the pop-up menu, then choose the color you want
Follow the prompt that comes up and click Set color to complete—you can also add a custom color via the color panel
7. Setting up automatic labeling in Gmail
Manually applying labels may not be taxing if you are dealing with only a few emails. But if you handle a high volume of messages, it’s neither sustainable nor effective for workflow productivity. That’s why Gmail offers a filtering system.
Gmail filters are rules you set up that teach Gmail what to do when it receives an email that matches your criteria. For example, you can set a filter that auto-applies a label to an email from a specific email address or username.
Here’s how to set it up:
Method #1
Open Gmail and navigate to the search bar at the top
Click the triple-slider icon to open the filter panel
Type in your filter criteria—sender, recipient name, subject, keywords, etc.
Click the Create filter option, and in the next panel, click the Apply the label checkbox
Choose the label you want Gmail to apply. Then click Create filter to complete the setup
💡Tip: If you don’t want the labeled emails to appear in your inbox, tick Skip the inbox. Select “Also apply filter to matching conversations” to label emails that are already in your inbox.
Method #2
At the top of the inbox, click the gear/settings icon, and then the See all settings button
Click the Filters and Blocked Addresses tab
Scroll down and select Create a new filter
Follow steps 3–5 listed in Method #1
How to use Gmail labels effectively
There are many ways to use labels to improve your productivity by adapting them to your workflow. Here are three tips to help you do that:
Set up sub-labels: If you have many related labels, organize them hierarchically by nesting them under a parent label. For instance, if you work on a construction project, a parent label named “Project Acme” can have sub-labels like “Kitchen plan updates” and “Floor plan updates.”
Archive labeled emails: If you’ve labeled an email and attended to the information within, archive it. This will help keep your inbox more organized.
Search by label: When looking for specific emails, use the label name in the search bar to narrow your results. You can type “label:Project Acme” in the search bar, and only emails from that label will appear.
Inbox organization needs can evolve, and labels that were once helpful may become outdated. Consider reviewing and refining your labels periodically to weed out unnecessary tags.
Drawbacks: Is there a way to enhance Gmail’s labeling system?
Gmail labels are a good starting point if you’re looking to achieve inbox organization, but they can sometimes require a lot from you.
You might find yourself constantly tweaking labels or creating multiple filters to ensure no email slips past. This is because Gmail’s labeling system is not the most intuitive, and you can’t realistically teach its filters how to classify emails based on the nuances of your daily messages and work patterns.
These limitations cause a constant need for manual label updates and modifications, begging the question: Is there a way to make labeling more teachable and adaptable?
The answer is yes. You can significantly enhance Gmail’s labeling systems using AI automation email tools designed to learn your email behaviors and adapt to your communication patterns more intuitively. Such categorization functions more efficiently compared to rigid Gmail rules, so you won’t have to micromanage your inbox anymore.
Notion Mail is one advanced Gmail client that offers this level of intelligent support. Its goes beyond the manual nature of Gmail’s labeling system to boost your email experience with features like:
Feature | What it offers |
Intelligent auto-labeling | Automatically categorizes and labels emails based on specific criteria and simple AI prompts, not complex manual filters |
Smart prioritization | Uses AI to identify and bring important emails to your attention, weeding out less relevant messages |
Tailored views | Creates mini inboxes that show you priority emails without being distracted by messages from other aspects of your workflow or life |
Notion Mail: The smarter way to organize email
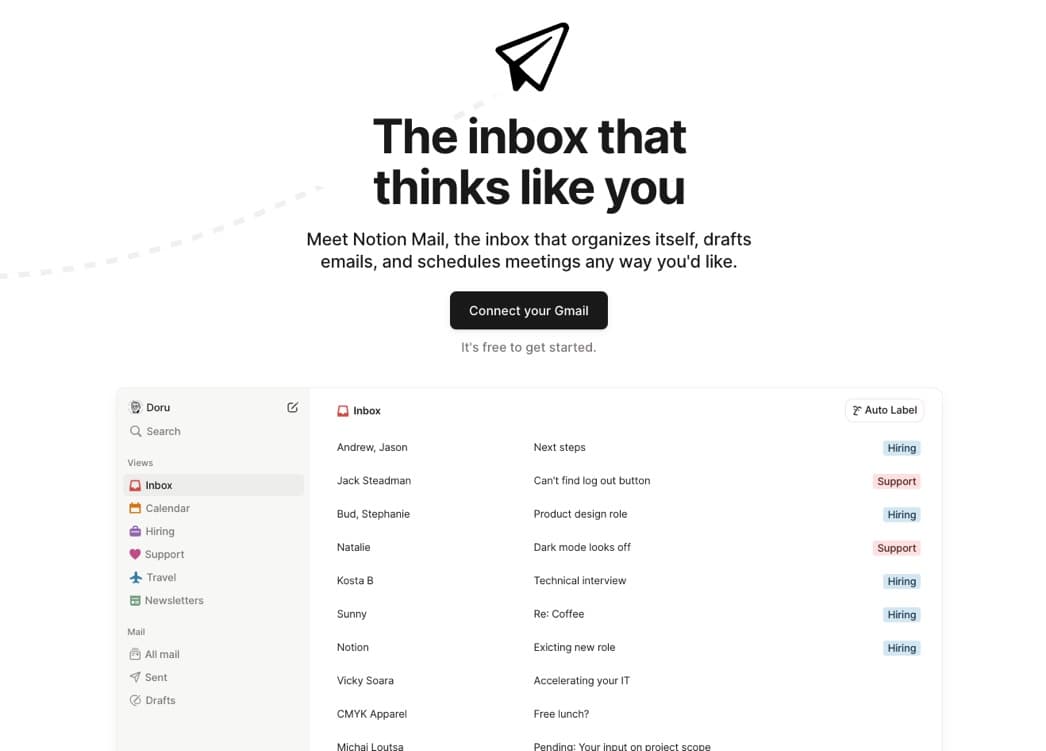
Notion Mail is a productivity-first email client designed to bring a new era of intelligence and efficiency to your inbox. It works exclusively with your Gmail account to transform your email management with AI-powered automation, helping you focus on real priorities.
Here are some of its core features and their functions:
AI autopilot: Learns your email behaviors and uses simple prompts to automatically sort and label incoming messages. You get a personalized, self-organizing inbox.
Customizable views and layouts: Create “inboxes within an inbox” that surface the emails you need, exactly when you need them. Instead of a single, overwhelming inbox, use simple AI prompts to filter your emails into unique views that serve you.
AI-driven email writing: Compose emails faster with AI-powered writing suggestions and create reusable, super-personalized snippets to help you save time when responding to common inquiries.
Automated scheduling: Use AI-powered short commands to schedule meetings directly from Notion Calendar or insert a scheduling button like Calendly into your email.
One-click unsubscribe: Use the one-click button to instantly unsubscribe from noisy senders.
How to get started with Notion Mail
To get started with Notion Mail, just connect your Gmail or Google account. The platform offers many advanced features for free. If you want to expand your AI automation options, upgrade your experience with the Notion AI add-on.
Bonus read: Trying to improve your inbox organization? You need these email management tutorial guides that break it down for you:
